NCM-MCI考試 - NCM-MCI證照考試
Wiki Article
此外,這些KaoGuTi NCM-MCI考試題庫的部分內容現在是免費的:https://drive.google.com/open?id=1JxCLkeRrfJ4W2lN4lOr2IVZWsc-gbfLZ
我們的Nutanix NCM-MCI考古題資料是多功能的,簡單容易操作,亦兼容。通過使用我們上述題庫資料幫助你完成高品質的NCM-MCI認證,無論你擁有什么設備,我們題庫資料都支持安裝使用。最新的NCM-MCI考題資料不僅能幫助考生提高IT技能,還能保證你的利益,提供給你最好的服務,KaoGuTi將成為你一個值得信賴的伙伴。一年之內,你還享有更新你擁有題庫的權利,你就可以得到最新版的Nutanix NCM-MCI試題。
KaoGuTi Nutanix的NCM-MCI考試培訓資料是個性價很高的培訓資料,與眾多培訓資料相比,KaoGuTi Nutanix的NCM-MCI考試培訓資料是最好的,如果你需要IT認證培訓資料,不選擇KaoGuTi Nutanix的NCM-MCI考試培訓資料,你將後悔一輩子,選擇了KaoGuTi Nutanix的NCM-MCI考試培訓資料,你將終身受益。
NCM-MCI證照考試 & NCM-MCI題庫最新資訊
期待成為擁有NCM-MCI認證的專業人士嗎?想減少您的認證成本嗎?想通過NCM-MCI考試嗎?如果你回答“是”,那趕緊來參加考試吧,我們為您提供涵蓋真實測試的題目和答案的試題。Nutanix的NCM-MCI考古題覆蓋率高,可以順利通過認證考試,從而獲得證書。經過考試認證數據中心顯示,KaoGuTi提供最準確和最新的IT考試資料,幾乎包括所有的知識點,是最好的自學練習題,幫助您快速通過NCM-MCI考試。
Nutanix NCM-MCI 考試大綱:
| 主題 | 簡介 |
|---|---|
| 主題 1 |
|
| 主題 2 |
|
| 主題 3 |
|
| 主題 4 |
|
| 主題 5 |
|
最新的 Master Level NCM-MCI 免費考試真題 (Q10-Q15):
問題 #10
Task 2
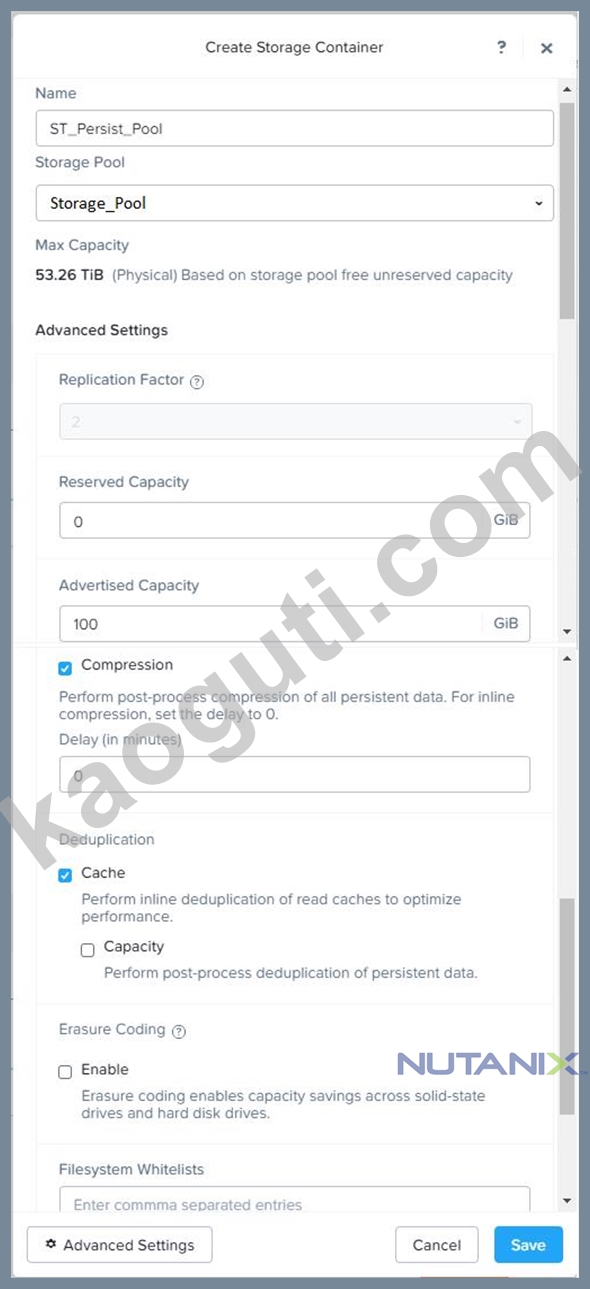
An administrator needs to configure storage for a Citrix-based Virtual Desktop infrastructure.
Two VDI pools will be created
Non-persistent pool names MCS_Pool for tasks users using MCS Microsoft Windows 10 virtual Delivery Agents (VDAs) Persistent pool named Persist_Pool with full-clone Microsoft Windows 10 VDAs for power users
20 GiB capacity must be guaranteed at the storage container level for all power user VDAs The power user container should not be able to use more than 100 GiB Storage capacity should be optimized for each desktop pool.
Configure the storage to meet these requirements. Any new object created should include the name of the pool(s) (MCS and/or Persist) that will use the object.
Do not include the pool name if the object will not be used by that pool.
Any additional licenses required by the solution will be added later.
答案:
解題說明:
See the Explanation for step by step solution
Explanation:
To configure the storage for the Citrix-based VDI, you can follow these steps:
Log in to Prism Central using the credentials provided.
Go to Storage > Storage Pools and click on Create Storage Pool.
Enter a name for the new storage pool, such as VDI_Storage_Pool, and select the disks to include in the pool. You can choose any combination of SSDs and HDDs, but for optimal performance, you may prefer to use more SSDs than HDDs.
Click Save to create the storage pool.
Go to Storage > Containers and click on Create Container.
Enter a name for the new container for the non-persistent pool, such as MCS_Pool_Container, and select the storage pool that you just created, VDI_Storage_Pool, as the source.
Under Advanced Settings, enable Deduplication and Compression to reduce the storage footprint of the non-persistent desktops. You can also enable Erasure Coding if you have enough nodes in your cluster and want to save more space. These settings will help you optimize the storage capacity for the non-persistent pool.
Click Save to create the container.
Go to Storage > Containers and click on Create Container again.
Enter a name for the new container for the persistent pool, such as Persist_Pool_Container, and select the same storage pool, VDI_Storage_Pool, as the source.
Under Advanced Settings, enable Capacity Reservation and enter 20 GiB as the reserved capacity. This will guarantee that 20 GiB of space is always available for the persistent desktops. You can also enter 100 GiB as the advertised capacity to limit the maximum space that this container can use. These settings will help you control the storage allocation for the persistent pool.
Click Save to create the container.
Go to Storage > Datastores and click on Create Datastore.
Enter a name for the new datastore for the non-persistent pool, such as MCS_Pool_Datastore, and select NFS as the datastore type. Select the container that you just created, MCS_Pool_Container, as the source.
Click Save to create the datastore.
Go to Storage > Datastores and click on Create Datastore again.
Enter a name for the new datastore for the persistent pool, such as Persist_Pool_Datastore, and select NFS as the datastore type. Select the container that you just created, Persist_Pool_Container, as the source.
Click Save to create the datastore.
The datastores will be automatically mounted on all nodes in the cluster. You can verify this by going to Storage > Datastores and clicking on each datastore. You should see all nodes listed under Hosts.
You can now use Citrix Studio to create your VDI pools using MCS or full clones on these datastores. For more information on how to use Citrix Studio with Nutanix Acropolis, see Citrix Virtual Apps and Desktops on Nutanix or Nutanix virtualization environments.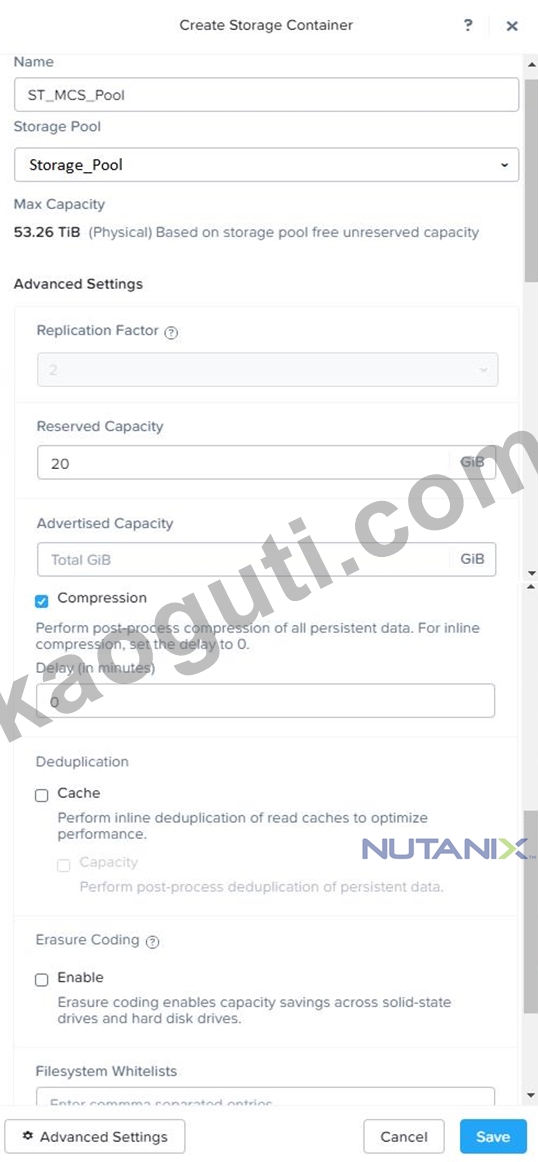
https://portal.nutanix.com/page/documents/solutions/details?targetId=BP-2079-Citrix-Virtual-Apps-and-Desktops:bp-nutanix-storage-configuration.html
問題 #11
Task 13
The application team is reporting performance degradation for a business-critical application that runs processes all day on Saturdays.
The team is requesting monitoring or processor, memory and storage utilization for the three VMs that make up the database cluster for the application: ORA01, ORA02 and ORA03.
The report should contain tables for the following:
At the cluster level, only for the current cluster:
The maximum percentage of CPU used
At the VM level, including any future VM with the prefix ORA:
The maximum time taken to process I/O Read requests
The Maximum percentage of time a VM waits to use physical CPU, out of the local CPU time allotted to the VM.
The report should run on Sundays at 12:00 AM for the previous 24 hours. The report should be emailed to [email protected] when competed.
Create a report named Weekends that meets these requirements
Note: You must name the report Weekends to receive any credit. Any other objects needed can be named as you see fit. SMTP is not configured.
A: Click Next.
Click on Add to add this custom view to your report. Click Next.
Under the Report Settings option, select Weekly from the Schedule drop-down menu and choose Sunday as the day of week. Enter 12:00 AM as the time of day. Enter [email protected] as the Email Recipient. Select CSV as the Report Output Format. Click Next.
Review the report details and click Finish.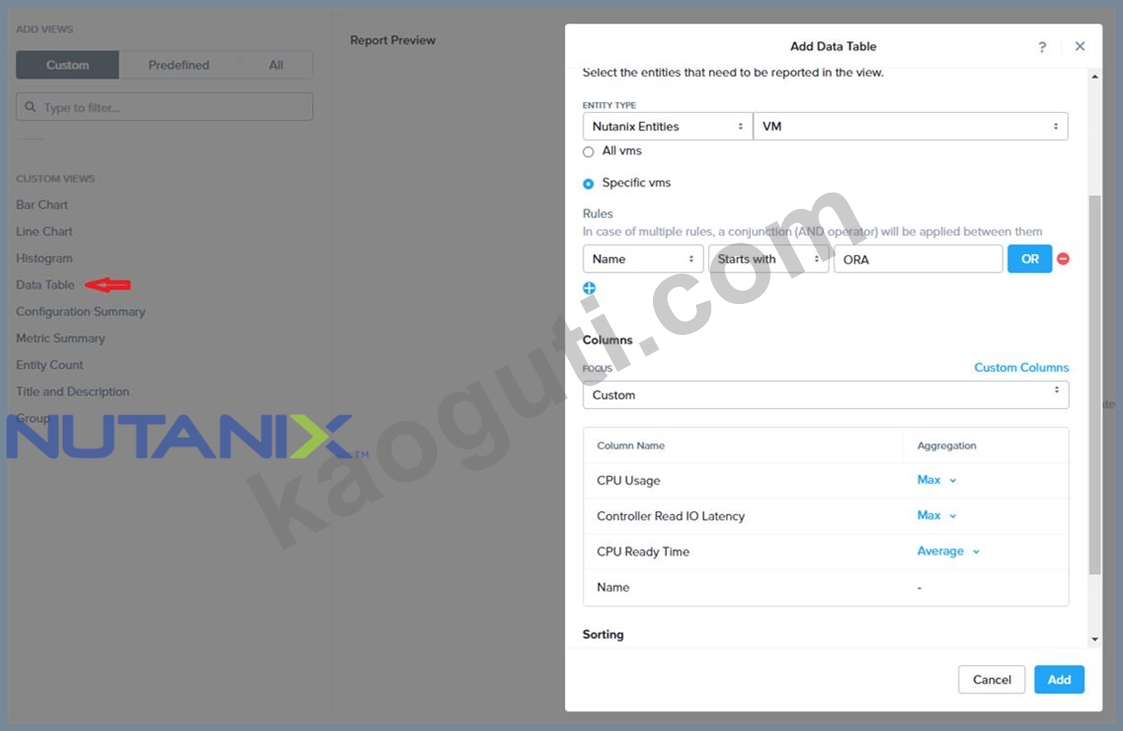
答案:
解題說明:
See the Explanation for step by step solution
Explanation:
To create a report named Weekends that meets the requirements, you can follow these steps:
Log in to Prism Central and click on Entities on the left menu.
Select Virtual Machines from the drop-down menu and click on Create Report.
Enter Weekends as the report name and a description if required. Click Next.
Under the Custom Views section, select Data Table. Click Next.
Under the Entity Type option, select Cluster. Click Next.
Under the Custom Columns option, add the following variable: CPU Usage (%). Click Next.
Under the Aggregation option for CPU Usage (%), select Max. Click Next.
Under the Filter option, select Current Cluster from the drop-down menu. Click Next.
Click on Add to add this custom view to your report. Click Next.
Under the Custom Views section, select Data Table again. Click Next.
Under the Entity Type option, select VM. Click Next.
Under the Custom Columns option, add the following variables: Name, I/O Read Latency (ms), VM Ready Time (%). Click Next.
Under the Aggregation option for I/O Read Latency (ms) and VM Ready Time (%), select Max. Click Next.
Under the Filter option, enter ORA* in the Name field. This will include any future VM with the prefix OR
問題 #12
Task 16
Running NCC on a cluster prior to an upgrade results in the following output FAIL: CVM System Partition /home usage at 93% (greater than threshold, 90%) Identify the CVM with the issue, remove the fil causing the storage bloat, and check the health again by running the individual disk usage health check only on the problematic CVM do not run NCC health check Note: Make sure only the individual health check is executed from the affected node
答案:
解題說明:
See the Explanation for step by step solution
Explanation:
To identify the CVM with the issue, remove the file causing the storage bloat, and check the health again, you can follow these steps:
Log in to Prism Central and click on Entities on the left menu.
Select Virtual Machines from the drop-down menu and find the NCC health check output file from the list. You can use the date and time information to locate the file. The file name should be something like ncc-output-YYYY-MM-DD-HH-MM-SS.log.
Open the file and look for the line that says FAIL: CVM System Partition /home usage at 93% (greater than threshold, 90%). Note down the IP address of the CVM that has this issue. It should be something like X.X.X.X.
Log in to the CVM using SSH or console with the username and password provided.
Run the command du -sh /home/* to see the disk usage of each file and directory under /home. Identify the file that is taking up most of the space. It could be a log file, a backup file, or a temporary file. Make sure it is not a system file or a configuration file that is needed by the CVM.
Run the command rm -f /home/<filename> to remove the file causing the storage bloat. Replace <filename> with the actual name of the file.
Run the command ncc health_checks hardware_checks disk_checks disk_usage_check --cvm_list=X.X.X.X to check the health again by running the individual disk usage health check only on the problematic CVM. Replace X.X.X.X with the IP address of the CVM that you noted down earlier.
Verify that the output shows PASS: CVM System Partition /home usage at XX% (less than threshold, 90%). This means that the issue has been resolved.
#access to CVM IP by Putty
allssh df -h #look for the path /dev/sdb3 and select the IP of the CVM
ssh CVM_IP
ls
cd software_downloads
ls
cd nos
ls -l -h
rm files_name
df -h
ncc health_checks hardware_checks disk_checks disk_usage_check
問題 #13
Task 3
An administrator needs to assess performance gains provided by AHV Turbo at the guest level. To perform the test the administrator created a Windows 10 VM named Turbo with the following configuration.
1 vCPU
8 GB RAM
SATA Controller
40 GB vDisk
The stress test application is multi-threaded capable, but the performance is not as expected with AHV Turbo enabled. Configure the VM to better leverage AHV Turbo.
Note: Do not power on the VM. Configure or prepare the VM for configuration as best you can without powering it on.
答案:
解題說明:
See the Explanation for step by step solution
Explanation:
To configure the VM to better leverage AHV Turbo, you can follow these steps:
Log in to Prism Element of cluster A using the credentials provided.
Go to VM > Table and select the VM named Turbo.
Click on Update and go to Hardware tab.
Increase the number of vCPUs to match the number of multiqueues that you want to enable. For example, if you want to enable 8 multiqueues, set the vCPUs to 8. This will improve the performance of multi-threaded workloads by allowing them to use multiple processors.
Change the SCSI Controller type from SATA to VirtIO. This will enable the use of VirtIO drivers, which are required for AHV Turbo.
Click Save to apply the changes.
Power off the VM if it is running and mount the Nutanix VirtIO ISO image as a CD-ROM device. You can download the ISO image from Nutanix Portal.
Power on the VM and install the latest Nutanix VirtIO drivers for Windows 10. You can follow the instructions from Nutanix Support Portal.
After installing the drivers, power off the VM and unmount the Nutanix VirtIO ISO image.
Power on the VM and log in to Windows 10.
Open a command prompt as administrator and run the following command to enable multiqueue for the VirtIO NIC:
ethtool -L eth0 combined 8
Replace eth0 with the name of your network interface and 8 with the number of multiqueues that you want to enable. You can use ipconfig /all to find out your network interface name.
Restart the VM for the changes to take effect.
You have now configured the VM to better leverage AHV Turbo. You can run your stress test application again and observe the performance gains.
https://portal.nutanix.com/page/documents/kbs/details?targetId=kA00e000000LKPdCAO change vCPU to 2/4 ?
Change SATA Controller to SCSI:
acli vm.get Turbo
Output Example:
Turbo {
config {
agent_vm: False
allow_live_migrate: True
boot {
boot_device_order: "kCdrom"
boot_device_order: "kDisk"
boot_device_order: "kNetwork"
uefi_boot: False
}
cpu_passthrough: False
disable_branding: False
disk_list {
addr {
bus: "ide"
index: 0
}
cdrom: True
device_uuid: "994b7840-dc7b-463e-a9bb-1950d7138671"
empty: True
}
disk_list {
addr {
bus: "sata"
index: 0
}
container_id: 4
container_uuid: "49b3e1a4-4201-4a3a-8abc-447c663a2a3e"
device_uuid: "622550e4-fb91-49dd-8fc7-9e90e89a7b0e"
naa_id: "naa.6506b8dcda1de6e9ce911de7d3a22111"
storage_vdisk_uuid: "7e98a626-4cb3-47df-a1e2-8627cf90eae6"
vmdisk_size: 10737418240
vmdisk_uuid: "17e0413b-9326-4572-942f-68101f2bc716"
}
flash_mode: False
hwclock_timezone: "UTC"
machine_type: "pc"
memory_mb: 2048
name: "Turbo"
nic_list {
connected: True
mac_addr: "50:6b:8d:b2:a5:e4"
network_name: "network"
network_type: "kNativeNetwork"
network_uuid: "86a0d7ca-acfd-48db-b15c-5d654ff39096"
type: "kNormalNic"
uuid: "b9e3e127-966c-43f3-b33c-13608154c8bf"
vlan_mode: "kAccess"
}
num_cores_per_vcpu: 2
num_threads_per_core: 1
num_vcpus: 2
num_vnuma_nodes: 0
vga_console: True
vm_type: "kGuestVM"
}
is_rf1_vm: False
logical_timestamp: 2
state: "Off"
uuid: "9670901f-8c5b-4586-a699-41f0c9ab26c3"
}
acli vm.disk_create Turbo clone_from_vmdisk=17e0413b-9326-4572-942f-68101f2bc716 bus=scsi remove the old disk acli vm.disk_delete 17e0413b-9326-4572-942f-68101f2bc716 disk_addr=sata.0
問題 #14
Task 10
An administrator is working to create a VM using Nutanix V3 API calls with the following specifications.
* VM specifications: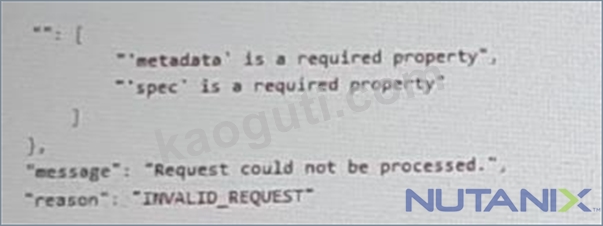
* vCPUs: 2
* Memory: BGb
* Disk Size: 50Gb
* Cluster: Cluster A
* Network: default- net
The API call is falling, indicating an issue with the payload:
The body is saved in Desktop/ Files/API_Create_VM,text
Correct any issues in the text file that would prevent from creating the VM. Also ensure the VM will be created as speeded and make sure it is saved for re-use using that filename.
Deploy the vm through the API
Note: Do not power on the VM.
答案:
解題說明:
See the Explanation for step by step solution
Explanation:
https://portal.nutanix.com/page/documents/kbs/details?targetId=kA00e000000LLEzCAO
https://jsonformatter.curiousconcept.com/#
acli net.list (uuid network defult_net)
ncli cluster info (uuid cluster)
Put Call: https://Prism Central IP address : 9440/api/nutanix/v3vms
Edit these lines to fix the API call, do not add new lines or copy lines.
You can test using the Prism Element API explorer or PostMan
Body:
{
{
"spec": {
"name": "Test_Deploy",
"resources": {
"power_state":"OFF",
"num_vcpus_per_socket": ,
"num_sockets": 1,
"memory_size_mib": 8192,
"disk_list": [
{
"disk_size_mib": 51200,
"device_properties": {
"device_type":"DISK"
}
},
{
"device_properties": {
"device_type":"CDROM"
}
}
],
"nic_list":[
{
"nic_type": "NORMAL_NIC",
"is_connected": true,
"ip_endpoint_list": [
{
"ip_type": "DHCP"
}
],
"subnet_reference": {
"kind": "subnet",
"name": "default_net",
"uuid": "00000000-0000-0000-0000-000000000000"
}
}
],
},
"cluster_reference": {
"kind": "cluster",
"name": "NTNXDemo",
"uuid": "00000000-0000-0000-0000-000000000000"
}
},
"api_version": "3.1.0",
"metadata": {
"kind": "vm"
}
}
https://www.nutanix.dev/2019/08/26/post-a-package-building-your-first-nutanix-rest-api-post-request/ Reference
問題 #15
......
通過Nutanix NCM-MCI 認證考試的方法有很多種,花大量時間和精力來復習Nutanix NCM-MCI 認證考試相關的專業知識是一種方法,通過少量時間和金錢選擇使用KaoGuTi的針對性訓練和練習題也是一種方法。
NCM-MCI證照考試: https://www.kaoguti.com/NCM-MCI_exam-pdf.html
- 可靠的NCM-MCI考試和資格考試領先提供商和驗證的NCM-MCI證照考試 ???? 來自網站➡ www.newdumpspdf.com ️⬅️打開並搜索➽ NCM-MCI ????免費下載NCM-MCI考古題更新
- 真實NCM-MCI考試 - 在Newdumpspdf中獲得最好的 ???? 在➥ www.newdumpspdf.com ????網站上查找➥ NCM-MCI ????的最新題庫NCM-MCI題庫最新資訊
- NCM-MCI題庫資訊 ???? NCM-MCI題庫資訊 ???? NCM-MCI證照考試 ???? 在☀ www.pdfexamdumps.com ️☀️搜索最新的⮆ NCM-MCI ⮄題庫NCM-MCI考試資料
- 已驗證的Nutanix NCM-MCI:Nutanix Certified Master - Multicloud Infrastructure v6.10考試 - 專業的Newdumpspdf NCM-MCI證照考試 ???? 免費下載⇛ NCM-MCI ⇚只需進入☀ www.newdumpspdf.com ️☀️網站NCM-MCI考古題更新
- 高質量的NCM-MCI考試,最新的考試資料幫助妳快速通過NCM-MCI考試 ???? 在《 www.pdfexamdumps.com 》網站上免費搜索⇛ NCM-MCI ⇚題庫最新NCM-MCI考古題
- NCM-MCI考古題更新 ???? NCM-MCI考題寶典 ???? NCM-MCI最新試題 ???? 打開網站➠ www.newdumpspdf.com ????搜索⮆ NCM-MCI ⮄免費下載最新NCM-MCI考題
- NCM-MCI熱門考古題 ???? NCM-MCI熱門考古題 ???? NCM-MCI最新試題 ???? 到[ www.vcesoft.com ]搜索[ NCM-MCI ]輕鬆取得免費下載最新NCM-MCI考題
- 最新版的NCM-MCI考試,免費下載NCM-MCI考試資料幫助妳通過NCM-MCI考試 ???? { www.newdumpspdf.com }提供免費⇛ NCM-MCI ⇚問題收集NCM-MCI在線考題
- 最新NCM-MCI考題 ???? NCM-MCI信息資訊 ???? NCM-MCI題庫最新資訊 ✔️ ( www.kaoguti.com )上搜索【 NCM-MCI 】輕鬆獲取免費下載NCM-MCI在線考題
- 最新版的NCM-MCI考試,免費下載NCM-MCI考試資料幫助妳通過NCM-MCI考試 ???? 請在➡ www.newdumpspdf.com ️⬅️網站上免費下載➽ NCM-MCI ????題庫NCM-MCI考題套裝
- 最新NCM-MCI考古題 ☸ NCM-MCI最新試題 ???? NCM-MCI考題寶典 ???? 立即在➠ www.newdumpspdf.com ????上搜尋▷ NCM-MCI ◁並免費下載最新NCM-MCI考題
- barbaramfnh780707.dreamyblogs.com, minibookmarks.com, mathevink540395.blazingblog.com, safazodv485569.bloggip.com, thebookmarklist.com, scrapbookmarket.com, darrengzlr138796.wikimidpoint.com, prestonxphu704360.blog2freedom.com, bookmarksurl.com, elijahkdyd736667.webdesign96.com, Disposable vapes
從Google Drive中免費下載最新的KaoGuTi NCM-MCI PDF版考試題庫:https://drive.google.com/open?id=1JxCLkeRrfJ4W2lN4lOr2IVZWsc-gbfLZ
Report this wiki page